ManageAccounts
Overview⚓︎
The Account section allows administrators to manage user access and permissions within the system. It provides tools to add, update, and monitor user accounts associated with specific customers and roles. This functionality ensures secure and controlled access to system features while maintaining a detailed log of account activities for auditing purposes.
Key Features:
- Account List: View and manage all user accounts, including associated roles and customers.
- Add and Edit Accounts: Create new accounts or modify existing ones, including their roles and customer associations.
- Role-Based Access Control: Assign roles like Admin, Customer Admin, or Read-Only to control access levels.
- Audit Logs: Monitor account activity, including login attempts and IP origins, for enhanced security.
Accounts List⚓︎
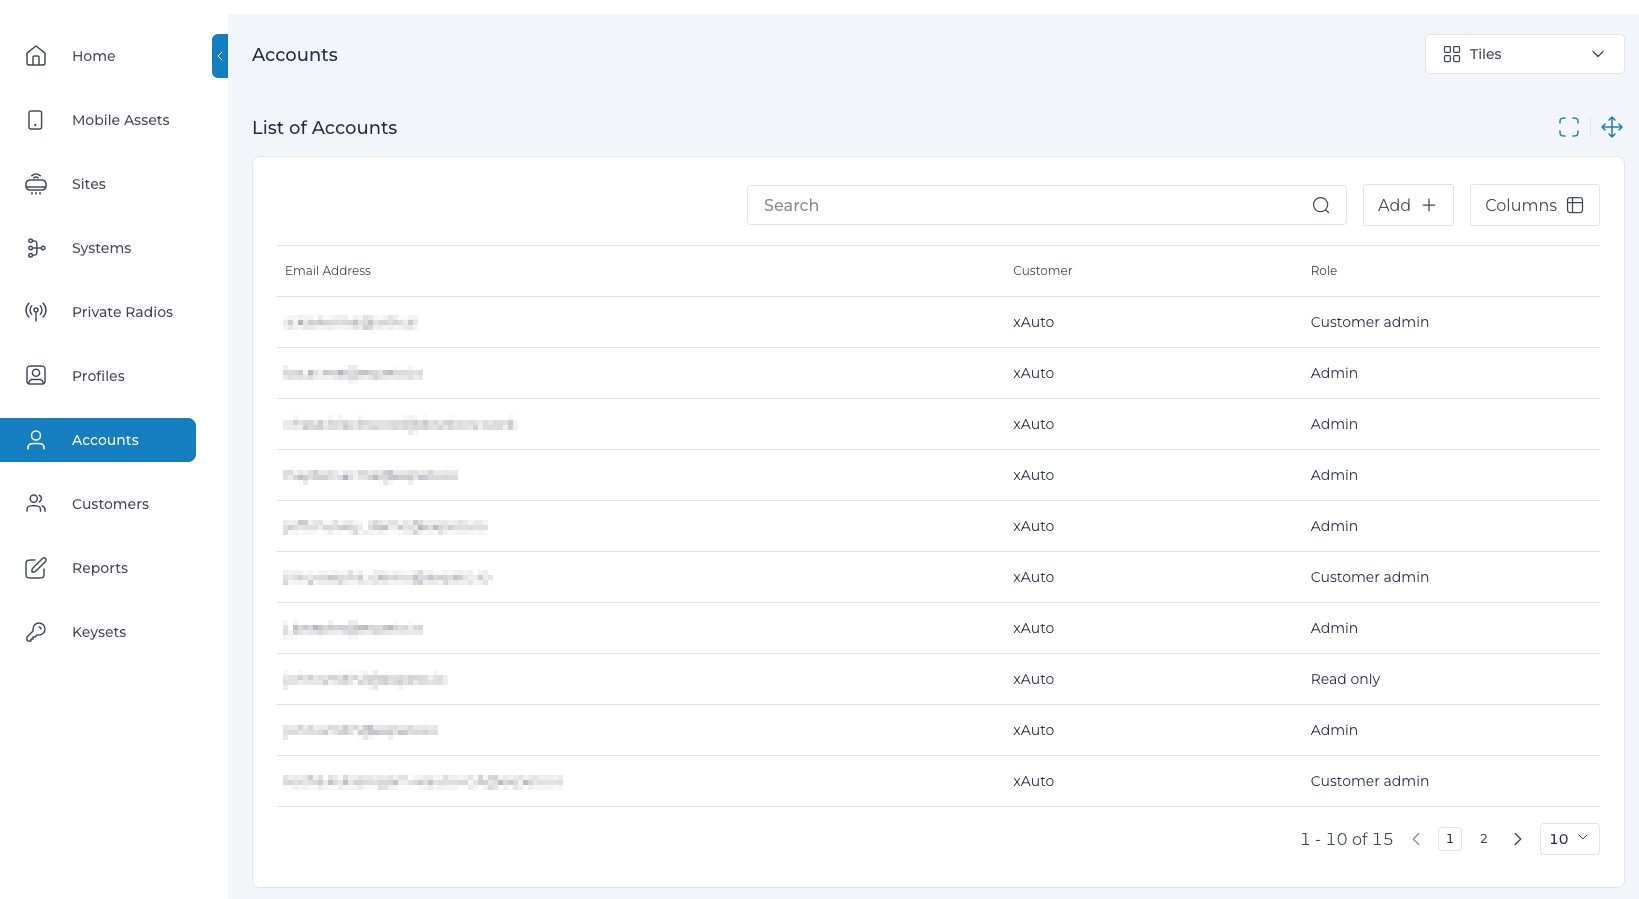
The Accounts section provides an overview of all user accounts associated with the system, including their roles and associated customers. From this view, you can add new accounts, filter and search existing accounts, and manage account details.
The Account List displays the following details for each user:
- Email Address: The unique email address of the account.
- Customer: The customer associated with the account.
- Role: The access level assigned to the account (e.g., Admin, Customer Admin, Read Only).
Features⚓︎
- Search: Use the search bar to quickly find accounts by email or customer name.
- Column Customization: Click Columns to toggle the visibility of specific columns in the list.
- Pagination: Navigate through accounts using the pagination controls at the bottom of the list.
Adding an Account⚓︎
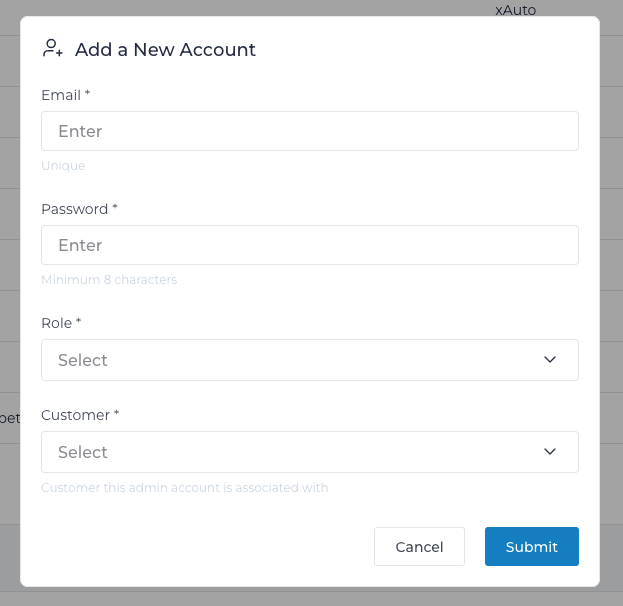
To add a new account:
- Click the Add button in the top-right corner of the Account List.
- Fill in the account details:
- Email: Enter a unique email address for the account.
- Password: Set a password with a minimum of 8 characters.
- Role: Select the appropriate role for the account (e.g., Admin, Customer Admin, Read Only).
- Customer: Assign the account to a specific customer.
- Click Submit to save the new account.
Note
- Ensure the email address is unique and follows proper email formatting.
- The assigned role dictates the account’s access level and permissions within the system.
- Accounts can be further managed or edited after creation through the Account Details section.
Account Details⚓︎
The Account Details section allows administrators to view and manage specific user accounts, including their credentials, associated customers, and roles. Additionally, accounts can be edited to update details or change access permissions.
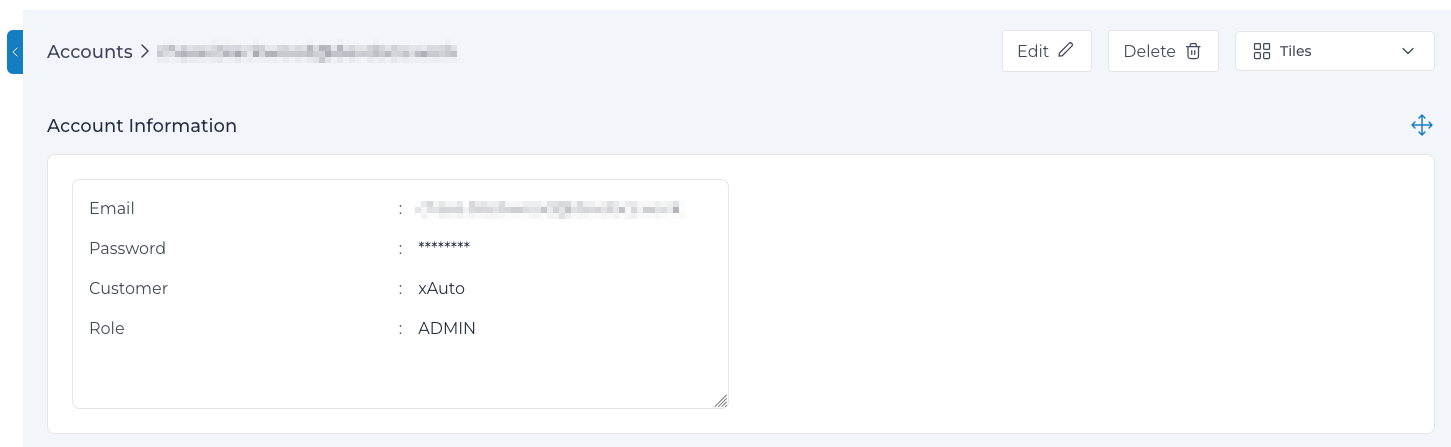
When an account is selected from the Account List, the Account Details section displays the following information:
- Email: The unique email address for the account.
- Password: A hidden field representing the account’s password.
- Customer: The customer to which the account is associated.
- Role: The access level assigned to the account (e.g., Admin, Customer Admin, Read Only).
Actions⚓︎
- Edit: Update account details or permissions.
- Delete: Permanently remove the account from the system.
Editing an Account⚓︎
- Navigate to the Account Details page of the desired account.
- Click the Edit button in the top-right corner.
- Update the following fields as needed:
- Email: Change the email address if required (must remain unique).
- Password: Update the account password (minimum 8 characters).
- Role: Select a different role to adjust the account’s permissions.
- Customer: Reassign the account to a different customer if applicable.
- Click Submit to save the changes.
Auditing Access⚓︎
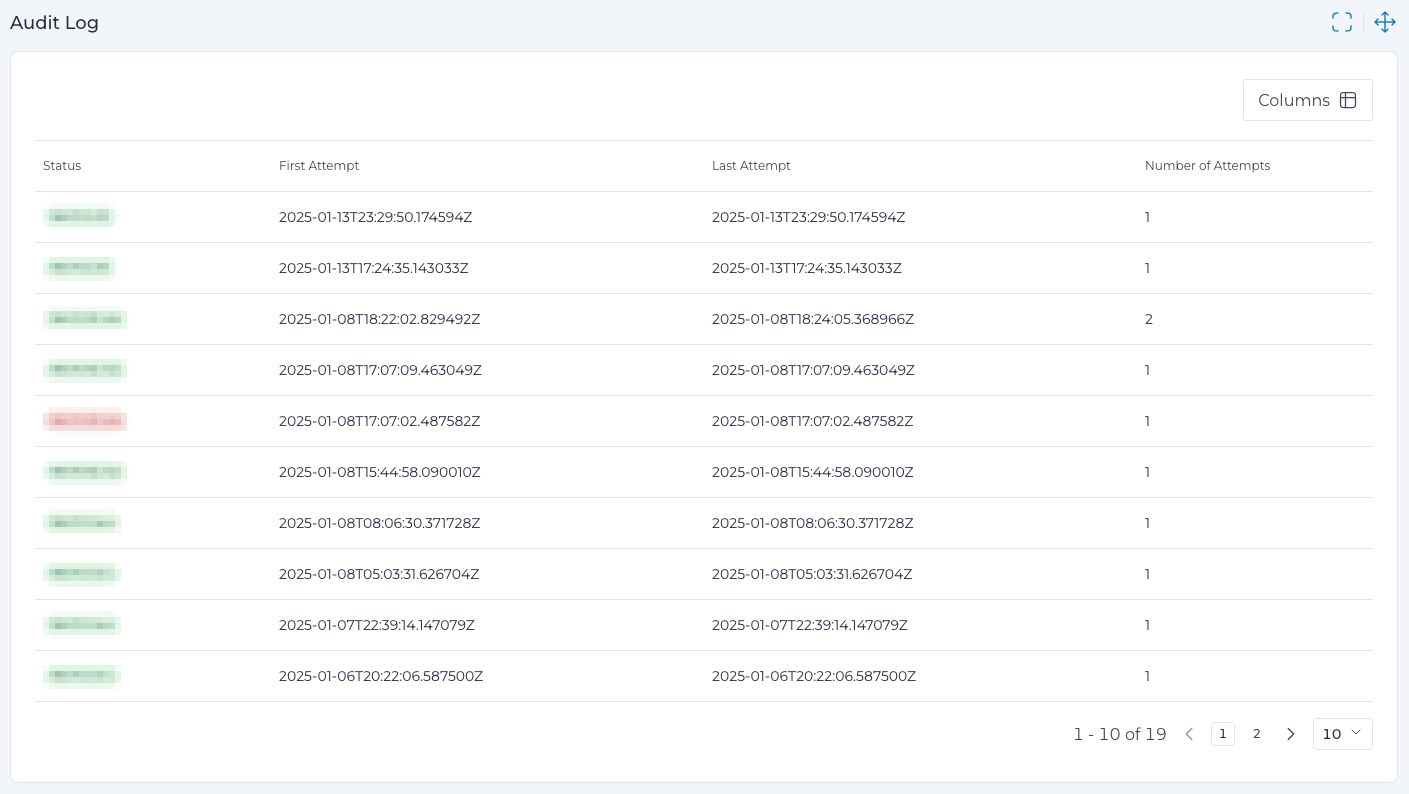
The Audit section provides administrators with a detailed log of account activity, enabling monitoring of access attempts and identifying potential security concerns. This information is essential for tracking usage patterns, troubleshooting login issues, and maintaining system security.
Columns⚓︎
- Email Address: The email address associated with the account attempting to access the system.
- IP Origin: The IP address of the device initiating the login attempt.
- First Attempt: The timestamp of the first login attempt recorded for this session.
- Last Attempt: The timestamp of the most recent login attempt for this session.
- Number of Attempts: The total number of login attempts made by the account within the session.
How to Use the Audit Log⚓︎
- Navigate to the Audit section in the Accounts menu.
- Review the list of login attempts displayed in the table.
- Type in the search bar to narrow the list, or click a sortable column heading to reorder it.
- Adjust the Columns settings to display or hide specific data points as needed.
Searching the audit log⚓︎
The search bar filters the full audit log, not just the rows currently on screen. Search on any of the following, alone or combined:
| Search on | Description | Example |
|---|---|---|
| The email address on the access attempt. Partial matches are supported. | email=user@example.com |
|
| IP | The IP origin of the attempt. Partial matches are supported. | ip=192.0.2 |
| Type | The outcome of the attempt: success, failure, or unknown. failed and error are accepted as synonyms of failure. |
type=failure |
| Account | Restricts results to a single Account, by Account ID. | account=123271682 |
| Customer | The Customer that owns the Account. | customer=AcmeCorp |
A term typed without a key is matched against email address, IP, attempt type, and Customer name, so failure on its own returns every failed attempt.
Auditing a single account⚓︎
The Account Details page carries its own Audit panel, listing only the access attempts for that Account. Its search bar accepts the ip and type terms described above.
Use this view when investigating a specific report — a locked-out user, or an unexpected sign-in — rather than filtering the system-wide log.
Reviewing inactive accounts⚓︎
To find Accounts that have not signed in recently, use the Last login before filter on the Accounts list. It takes a date and returns every Account with no successful sign-in since that date, including Accounts that have never signed in at all. Suggestions for 12, 18, and 24 months ago are offered, and any date can be typed in YYYY-MM-DD form.
This supports periodic access reviews, such as revoking Accounts dormant for 18 months or more.
Note
The date is evaluated as midnight UTC, not in your local time zone. An Account that signed in late on the previous day in a western time zone may fall on the far side of the cutoff and not appear in the results. The timestamps shown in the Audit log are UTC for the same reason.
Note
- IP origins displayed in red indicate potential security concerns, such as login attempts from unrecognized or flagged locations.
- Regularly reviewing audit logs helps maintain a secure system environment and ensures compliance with access policies.